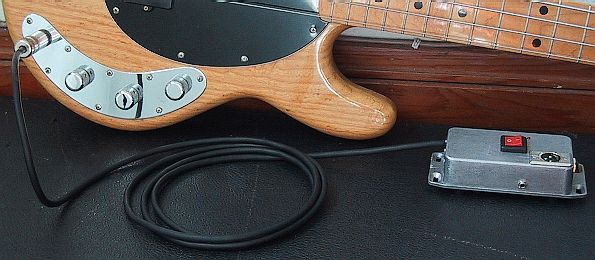

I've recently enhanced my Active Plug direct box with a bootstrap circuit which substantially increases headroom and reduces harmonic distortion, when compared to my original Active Plug Classic direct box. I've also added the ability to accept and use phantom power. On this page I give the complete schematic diagram, describe theory of operation, discuss parts choices, list some performance characteristics, and finally show some photos of construction details.
 |
 |
Here are some DC voltages, measured with a +9.0 VDC power supply connected to D303, where it is marked "EXT. PWR." Readings may vary, depending on characteristics of Q101.
| B+ | +8.4 |
| Q101 Gate | +0.0 |
| Q101 Source | +2.4 |
| Q101 Drain | +7.8 |
| Q201 Base | +2.4 |
| Q201 Emitter | +3.0 |
| Q201 Collector | +0.0 |
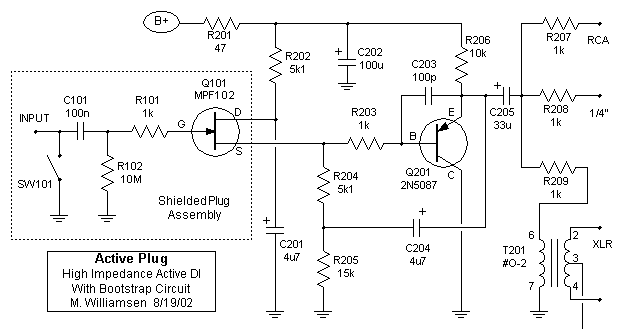
Just as with Active Plug Classic, the Active Plug Bootstrap starts with a JFET source-follower mounted inside the head shell of a Switchcraft SilentPlug 1/4" phone plug. This is connected by a 6 foot length of shielded twisted pair mic cable to a battery box which houses an emitter follower stage, mic output transformer, and support circuitry. 100 series part numbers are all inside the SilentPlug, and are essentially the same as in Active Plug Classic.
200 series parts are in the battery box, and provide the drive capability needed to run multiple outputs simultaneously. For instance, you might be running a guitar amplifier on stage, and also feeding a balanced mic-level signal to a mixing board at the same time. Gain is set to unity and there is no equalization so the signal at the output exactly mirrors the signal at the input, but with more drive capability. This section is also similar to Active Plug Classic, but with the addition of a new bootstrap circuit consisting of C204, R204, and R205. The source load of Q101 is now split, and driven in the middle by the output signal. This effectively keeps voltage across R204 constant, causing channel current in Q101 to also be constant. Since gate-source voltage is related to channel current, gate-source voltage remains constant, and the voltage at the source closely follows input voltage at the gate. C204 also supplies extra current for negative-going excursions of source voltage. The source remains linear, even below the ground rail! The end result is a significant reduction of harmonic distortion, as well as increased headroom.
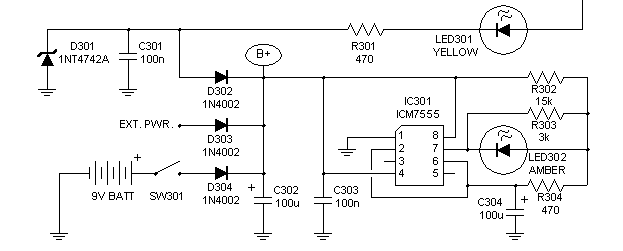
Phantom power is taken from a center tap of the mic level winding on transformer T201, and regulated to +12 VDC by zener diode D301. This was chosen to be slightly higher than the battery voltage of +9 VDC so that power switching occurs automatically and seamlessly when needed. Note that while there is a DC current flowing through the transformer windings when phantom power is connected, it travels in opposite directions in each leg of the winding, so there is no net magnetization of the transformer core. External power from a 9 VDC wall brick can be fed into D303.
I've added an LED flasher at IC301/LED302 to help trouble-shoot power supply problems. This nearly doubles overall power consumption, but I feel it's worth the extra drain to know whether you have power or not. Be sure that the ground path from C304 to IC301 doesn't include any audio ground paths, or you might be injecting a DC bounce into the audio each time the LED flashes. Parts values shown cause the LED to flash briefly about once per second. With a high brightness LED, this will be visible in direct sun light.
Most of the parts used are inexpensive and easily obtained, although one exception might be the mic transformer. You'll want good shielding and plenty of iron in the core, especially if you will be running bass or keyboards through it.
Here are some performance characteristics, measured on both Active Plug Bootstrap and Active Plug Classic, with a +9.0 VDC power supply connected in place of the battery.
| Active Plug Bootstrap | Active Plug Classic | |
|---|---|---|
| Input For 1% THD at 100 Hz | 2.1 Vrms | 1.3 Vrms |
| THD at 100 Hz, 1.0 Vrms | 0.2 % | 0.6 % |
| Freq. Response, 20Hz-20kHz | +0.0/-0.1 dB | +0.0/-0.1 dB |
| Gain (Loss) | -0.2 dB | -1.0 dB |
| Current Drain | 1.7 mA | 1.7 mA |
Everything starts with the Switchcraft SilentPlug, part #172. Your best source for this plug is Mouser Electronics. The SilentPlug has a built-in grounding switch which protects the preamp when not in use, and allows you to unplug your instrument while on stage without deafening your audience. The head shell has enough room for the JFET source follower, and has a clamping strain relief suitable for 0.25" diameter microphone cable.
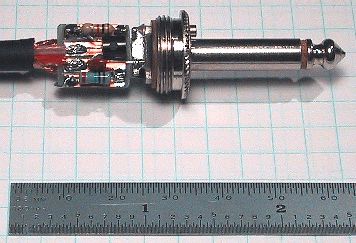
I took a 0.5" square scrap of 0.055" copper-clad epoxy-glass circuit board material and used a Dremel tool to cut slots through the copper, dividing the board into 5 lands, one for each node in the source follower circuit. I soldered all of the parts in place surface-mount style, with no through holes. Then, I sawed off most of the tip terminal and epoxied the circuit board to the sleeve terminal. Be sure that the grounding switch doesn't hit the circuit board when activated. The head shell should thread on easily without friction or interference. The insulator provided by Switchcraft will prevent shorts from the circuit board to the head shell. I chamfered the edges of the circuit board a little so that if anything does touch, it will be the epoxy glass, not the copper foil.
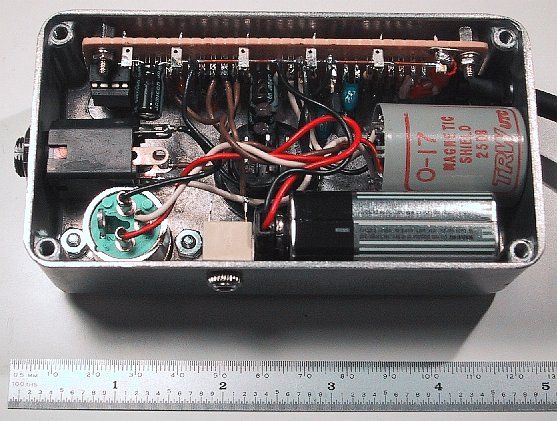
You can't beat a die-cast box for strength and shielding. I used a Hammond box from DigiKey. As you can see from the photo, the one I picked is too small. The tight quarters make it harder than it should be to maintain and service. Most of the circuitry is placed on a 3.75" by 1.00" piece of 0.062" thick perf board, with holes on 0.100" centers. I used Vector T-42 terminals, wired with a "wrap and burn" technique using magnet wire. The bus wire at the top of the board is connected to case ground through the metal standoff on the right. Not shown is the insulator I slipped between the circuit board and case, to prevent unwanted short circuits. The two conductor shielded mic cable which connects to the SilentPlug enters the right side of the case through a grommet, and is anchored to the perf board with a nylon cable tie.
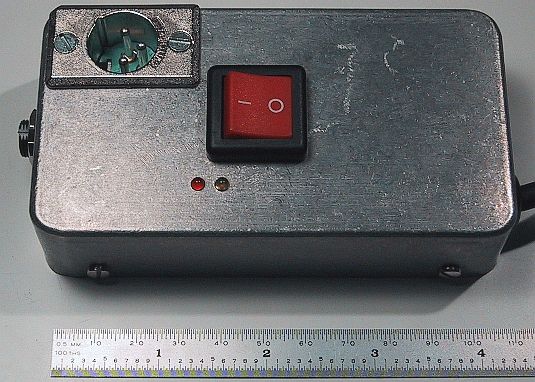
I've been using the Active Plug Bootstrap on a variety of recording and performance dates, especially with the Pommersche Tanzdeel Freistadt. It has interfaced well with Mackie and Yamaha mixing consoles, and with the MOTU 828 FireWire digitizer. It has provided clean, accurate sound with acoustic and electric guitars, as well as electric and stand-up bass using a Fishman transducer.
I am placing the circuit ideas and schematic diagram presented on this page in the public domain, for the benefit of musicians and engineers. Please remember that only you can determine if these ideas are suitable for your application. Feel free to post a link to this page on your site, but please don't copy my content. This page should be available at this URL for the foreseeable future. I claim a trademark interest in the names "Active Plug Classic" and "Active Plug Bootstrap".

